Batch Image Converter: Fast Offline Processing Guide
Ayush Soni
Founder, File Studio
On this page
- Why You Need an Offline Batch Image Converter
- Privacy and compatibility usually break first
- Preparing Your Images for Flawless Batch Conversion
- Set up a safe working structure
- Check a small sample before the full run
- Choosing Your Output Format and Quality Settings
- Match the format to the job
- Image Format Comparison for Batch Conversion
- Quality settings that hold up outside test images
- Converting Modern and Professional Image Formats
- HEIC to JPG without browser friction
- RAW conversion needs a real workflow
- WebP and AVIF are delivery formats, not master formats
- Resize and rename during conversion
- Cleaning Metadata and Automating Your Workflow
- What metadata should be removed
- Use presets and watch folders for repeated jobs
- Troubleshooting Common Batch Conversion Problems
- What causes bad output
- A practical pre-flight checklist
You've probably got a folder full of images that are technically fine and practically useless. iPhone photos in HEIC that a client portal won't accept. Camera RAW files that need lighter web copies. Scans of IDs, contracts, or receipts that can't leave your machine. The job isn't hard. The friction is.
A common approach is to reach for the first online converter they find. That works right up until it doesn't. Files stall in a browser tab, formats fail, metadata stays attached, or you realize too late that uploading private images to a web service was the wrong call.
Why You Need an Offline Batch Image Converter
A browser converter looks convenient when you're under pressure. Drop files in, wait, download, move on. That's the sales pitch. The main trade-off is control.
If you handle anything sensitive, even occasionally, uploading a batch of images to a third-party service is a weak link. IDs, HR paperwork, contracts, intake forms, insurance photos, annotated screenshots, internal reports. Those files often contain more than the visible pixels.
Metadata leakage is the part many people miss. GPS coordinates, device details, author information, timestamps, and embedded tags can travel with the export if the tool doesn't clean them properly. That's one reason privacy-conscious teams avoid web tools for routine conversion work.
Data from a 2024 global privacy survey found that 78% of legal and finance professionals refuse to upload client documents to web converters because of data exposure concerns, while 92% of top-ranking pages for “batch image converter” are still web-based tutorials (Digital Privacy Alliance survey summary). That mismatch is exactly why so many people end up with advice that's convenient for search results and bad for actual operations.
Privacy and compatibility usually break first
Online converters also fail where modern workflows start getting serious.
- HEIC and RAW support is inconsistent: Browser tools often choke on newer camera and phone formats.
- Large batches become unreliable: Upload queues, tab timeouts, and retries turn a simple task into babysitting.
- You lose local control: You can't inspect where files are stored, how long they remain there, or what processing happens behind the interface.
Practical rule: If the files would be a problem in the wrong inbox, they shouldn't go through a random web converter.
There's also a format reality that broad “free converter” pages gloss over. If you're doing any repeat work with images, you'll eventually need more than conversion alone. You'll resize, rename, strip metadata, and standardize output folders. That's why broader workflow habits matter. A good primer on that side of the job is this guide on Batch Edit Photos, especially if your conversion process usually turns into cleanup work afterward.
For privacy-first workflows, local processing is the cleaner approach. A proper desktop app keeps everything on your device, avoids browser upload limits, and gives you a repeatable path for sensitive material. If you want that model spelled out clearly, this overview of how to convert files without uploading is the right baseline.
Preparing Your Images for Flawless Batch Conversion
Batch conversion goes wrong before the first file is processed. It usually starts with poor folder structure, no backup, or output files landing in the same place as the originals.
The core idea behind automation isn't new. The first dedicated batch image processing capabilities appeared in the early 1990s with Adobe Photoshop 2.0, which introduced a Script feature for automating repetitive tasks across multiple files. That shift established the workflow logic professionals still follow today, and modern tools now handle over 10,000 files per session.
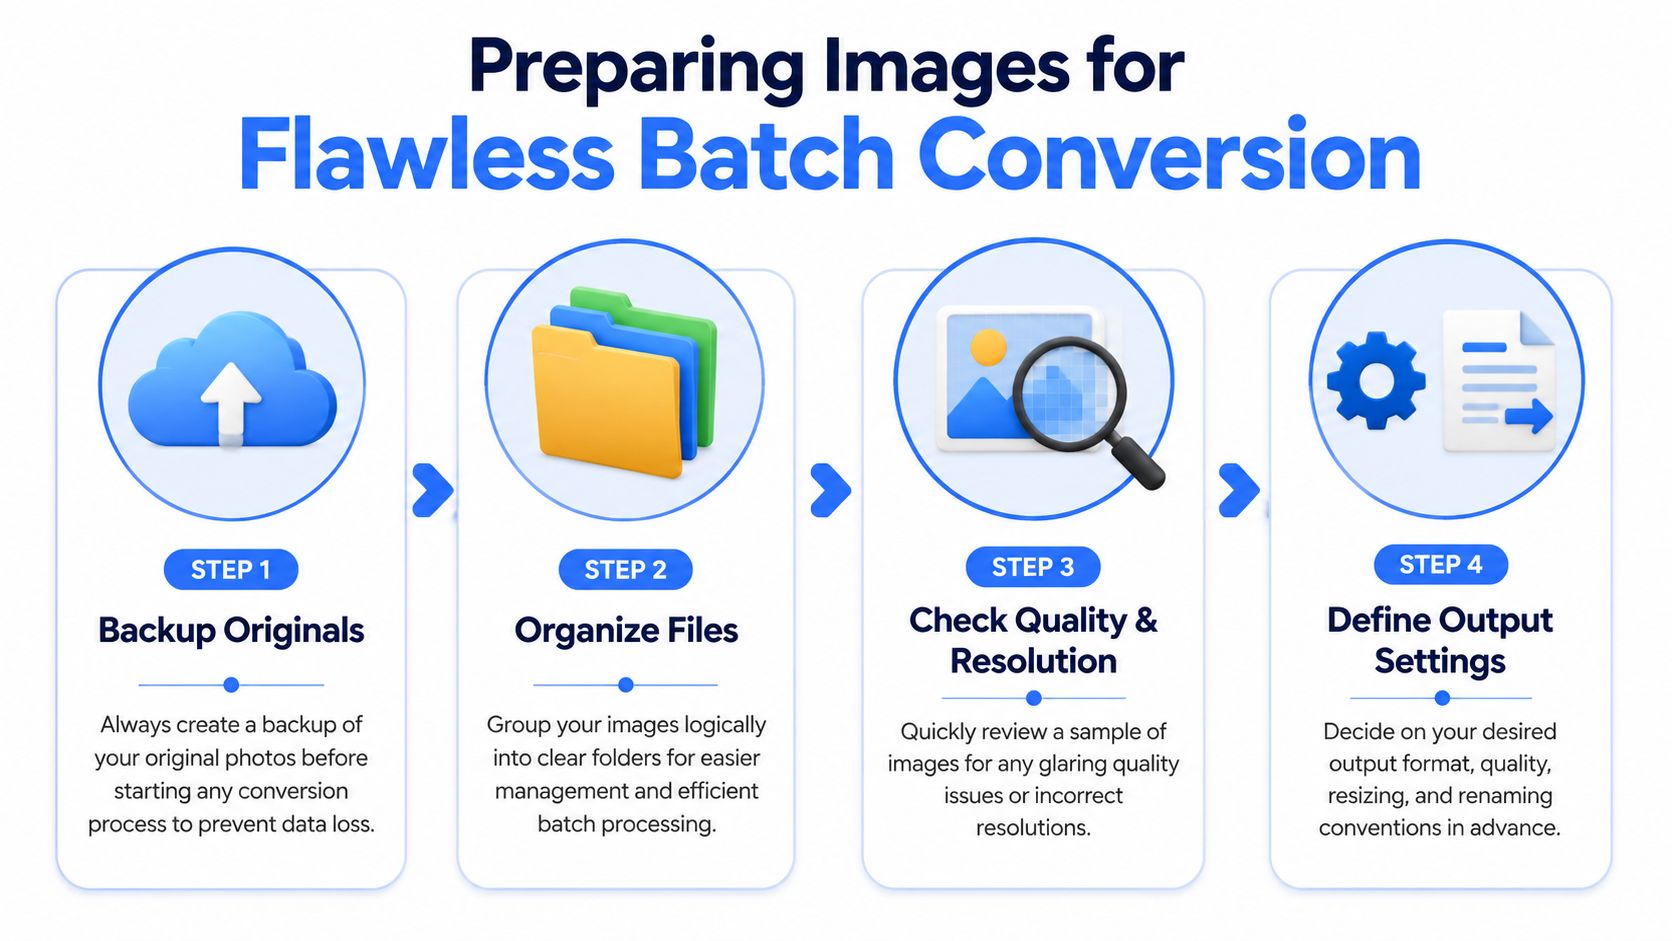
Set up a safe working structure
Don't dump everything into one folder and hope the app sorts it out. Use a simple structure that makes mistakes harder.
- Create a Source folder
Put only the original files here. No edited copies. No previous exports. - Create an Output folder
Every converted file goes here. Keep it separate from the originals every time. - Make a backup before large jobs
Duplicate the Source folder if the images matter. That includes client work, event photos, legal scans, and anything difficult to recreate. - Name folders by project and target
“Conference-HEIC-to-JPG” is better than “new images final final.”
This sounds basic because it is. It also prevents the most expensive mistakes. The more files you process, the more boring discipline matters.
Check a small sample before the full run
A batch image converter can process hundreds of files quickly. That doesn't mean you should trust the first settings you click.
Start with a small sample and inspect the output closely:
- Open a few portrait and horizontal images: This catches crop and resize issues fast.
- Check one dark image and one bright image: Compression artifacts show up differently depending on the scene.
- Verify filenames and destination folders: Messy naming compounds later when someone needs to upload or archive the files.
- Confirm the target format works where it's supposed to: A JPEG that opens locally still might not meet a portal's size or profile expectations.
Run a small proof batch first. Five minutes of checking beats cleaning up five hundred bad exports.
I also recommend deciding your output rules before you start. Pick the file format, quality level, size rules, naming pattern, and destination folder up front. That turns conversion into execution rather than experimentation.
Choosing Your Output Format and Quality Settings
A bad export choice usually shows up after the conversion finishes. The folder looks fine, the batch completes, and then the client portal rejects the files, the website serves images that are larger than they should be, or the photos pick up ugly artifacts in faces and shadows. Output settings decide whether batch conversion saves time or creates cleanup work.
Format choice should follow the destination, not personal preference.
Match the format to the job
JPG is still the safe default for broad compatibility. Use it for client uploads, shared folders, email attachments, CMS libraries, and any handoff where you do not control the receiving system. It drops transparency and it is lossy, but almost everything opens it correctly.
PNG fits graphics, screenshots, interface captures, and anything with transparency or sharp text. File sizes climb fast, especially if someone exports full-resolution screenshots by habit, but PNG avoids the smeared edges JPEG often adds around logos and small type.
WebP is a strong delivery format for websites and apps. Google's WebP documentation shows that WebP can produce smaller files than JPEG and PNG at similar visual quality for many web use cases (WebP compression study). That makes it a practical choice for teams focused on loading speed, especially if they are also boosting PageSpeed with next-gen images.
AVIF can shrink files even further, but support and encoding speed still need checking in real workflows. I use it for confirmed web pipelines, not for general handoff.
TIFF is the format to keep around when image quality matters more than size. It works well for print, archive copies, and intermediate files you may need to edit again after delivery.
Image Format Comparison for Batch Conversion
| Format | Best For | Supports Transparency | File Size |
|---|---|---|---|
| JPG | Photos, email, uploads, client handoff | No | Small |
| PNG | Logos, screenshots, graphics, transparency | Yes | Large |
| WebP | Websites, modern web delivery, mixed assets | Yes | Smaller than many traditional web exports |
| AVIF | Next-gen web delivery where support is confirmed | Yes | Very small in many workflows |
| TIFF | Archiving, print, high-quality intermediate files | Some workflows do | Large |
There is no universal best format. There is only the format that survives the destination without wasting storage, breaking transparency, or exposing avoidable compatibility problems.
Quality settings that hold up outside test images
The quality slider causes more damage than the format menu.
With JPEG and WebP, file size drops quickly as quality goes down. Fine detail disappears first. Skin texture gets waxy. Dark gradients start banding. Text overlays and UI elements pick up halos that were not visible in the original. A setting that looks acceptable on one bright outdoor photo can fall apart on a dim event shot.
My rule is simple. Start higher than you think you need, then inspect problem areas at 100% zoom. Check faces, edges against solid backgrounds, shadows, and any text inside the image. If those hold up, reduce quality in small steps until the size savings stop being worth the damage.
A few practical defaults help:
- Website photos: Start with WebP or JPEG at a conservative quality setting, then inspect faces, edges, and shadow detail.
- Screenshots, diagrams, and UI exports: Use PNG first. Switch only if file size becomes a real constraint.
- Archive copies or future edits: Keep TIFF or another high-quality master. Generate delivery versions separately.
- Unknown client environments: Export JPEG unless the client specifically requests WebP, PNG, TIFF, or AVIF.
For camera originals, keep the conversion goal separate from the preservation goal. If you are processing files from mirrorless or DSLR shoots, this guide to an offline RAW image converter workflow covers the safer approach for retaining detail before you create smaller delivery copies.
Presets save more time than people expect. Save one for web JPEG, one for transparent PNG, one for WebP delivery, and one for archive TIFF. Then the batch job becomes consistent instead of improvised. That matters even more when the files are private and should never be uploaded to a browser converter just to guess at output settings.
Converting Modern and Professional Image Formats
A batch job usually looks easy until the folder is full of iPhone HEIC files, camera RAW originals, and a few web-ready exports mixed together. That is where online converters start breaking down. Support is inconsistent, upload limits get in the way, and sensitive images leave your machine before you have even checked the output.
Offline batch processing handles this class of work better because it keeps the originals local and gives you control over color, naming, and output rules in one pass. That matters most with HEIC, RAW, WebP, and AVIF, where format support is uneven and the wrong default can subtly damage the result.

HEIC to JPG without browser friction
HEIC is common on iPhones for a reason. The files are compact and image quality is good. The trouble starts later, when a client portal rejects them, a coworker on an older Windows setup cannot open them, or a CMS expects JPEG.
For that job, keep the process boring and consistent:
- Load the full HEIC folder
- Set JPEG as the output for broad compatibility
- Send exports to a separate destination folder
- Resize only if the delivery target has a clear size limit
- Test a few files first for orientation, color, and filename handling
Local conversion is usually easier to supervise because every file stays on disk and failures are visible right away. You are not waiting on uploads, rate limits, or a browser tab that stalls halfway through a private client set. If your next step is web delivery, this guide on boosting PageSpeed with next-gen images is useful after you have created clean local masters and delivery copies.
RAW conversion needs a real workflow
RAW files need more care than a normal format export. They contain sensor data, camera-specific color behavior, and far more editing latitude than a JPEG or PNG. Treat them like ordinary source files and the problems show up fast in skin tones, highlight rolloff, shadow detail, and contrast.
The safe approach is simple. Pick the output color space on purpose, inspect a small sample before running the full batch, and keep the originals untouched. For web and client review, sRGB is usually the right choice because it avoids the profile mismatch problems that still show up in browsers, office apps, and review platforms.
A few checks save a lot of rework:
- Compare a test export against the RAW edit at 100% zoom
- Watch neutrals and skin first
- Confirm the embedded profile before sending files out
- Keep delivery exports separate from archive masters
For repeated camera workflows, a dedicated RAW image converter workflow for preserving detail is worth setting up once and reusing. It turns a fragile manual process into something consistent, which is exactly what you want when the files are private or irreplaceable.
WebP and AVIF are delivery formats, not master formats
WebP and AVIF are useful, but they are final-delivery choices, not places to keep your only copy. Both can cut file size well for web use. Both can also expose compatibility issues in older software, client review tools, and internal systems that still expect JPEG or PNG.
My rule is straightforward. Keep a high-quality master, then generate WebP or AVIF versions only for the channels that benefit from them. That avoids the common mistake of batch-converting everything into a modern format, then having to convert it all back when a client asks for editable or universally compatible files.
Resize and rename during conversion
Batch conversion gets more useful when resizing and renaming happen in the same pass. It saves time, and it keeps mixed folders from turning into a handoff mess.
If the output is for a website, set a maximum width and preserve aspect ratio automatically. If the files are for archive, print review, or future editing, keep dimensions closer to the source and focus on format and naming consistency. Use names that survive handoff cleanly:
event-001.jpgevent-002.jpgevent-003.jpg
That small bit of discipline helps later when someone has to upload, review, search, or reference the files without guessing what IMG_4388 was supposed to be.
Cleaning Metadata and Automating Your Workflow
A batch job is easy to trust until someone forwards an exported image and realizes it still contains GPS coordinates, staff names, or editing history. I have seen that happen with property photos, internal documentation, and client review files. The image looked fine. The hidden data was the problem.
Online converters make this worse because you are dealing with two risks at once. You are uploading the file to a third party, and you often get limited control over what metadata survives the export. For sensitive images, that is a bad trade.
What metadata should be removed
For public sharing or client delivery, remove anything that does not serve the recipient.
The fields that deserve a quick check are usually the same:
- Location data: GPS tags can expose where a photo was taken.
- Author and software fields: These can reveal employee names, internal tools, or parts of the editing chain.
- Capture details: Camera and lens data is usually harmless, but it rarely helps in a handoff.
- Embedded comments and tags: Old notes and labels often stay attached longer than expected.
The practical issue is consistency. Some converters preserve metadata unless you tell them not to. Others strip some fields but leave others behind. That is why I prefer local tools with an explicit metadata removal setting instead of generic web utilities with unclear defaults.
If you handle client submissions, HR records, finance documents, legal exhibits, or modern phone photos in HEIC, metadata cleaning should be built into the export preset. It should not depend on someone remembering a checkbox at the end of a long batch run.
Use presets and watch folders for repeated jobs
Manual repetition is where batch workflows start to drift. One run keeps GPS data. The next uses the wrong quality setting. A third dumps exports into the source folder and creates cleanup work no one wanted.
A good preset stores the rules you want every time:
- Target format
- Quality level
- Resize rules
- Naming pattern
- Metadata removal
- Output folder
It also helps to separate visual editing choices from output rules. Department of Vibe on profiles vs presets explains that distinction well. In day-to-day image operations, presets should define repeatable export behavior, not just the look of the file.
Watch folders are what make the process stick. Drop inbound screenshots into one folder and export cleaned, web-ready JPEGs automatically. Send phone images or RAW selects into another and apply your naming rules, output settings, and metadata stripping without touching each file by hand.
For teams that want repeatable local processing without sending sensitive images to a browser tool, offline batch operations for image conversion are the feature to look for. Files stay on the machine, privacy rules stay consistent, and routine jobs stop eating half the morning.
Troubleshooting Common Batch Conversion Problems
A batch job usually goes wrong in familiar ways. Files come out stretched, colors shift, exports are larger than expected, a few images fail outright, or the converted set lands on top of the originals. None of that is random. It usually traces back to resize rules, color management, format support, or output location.
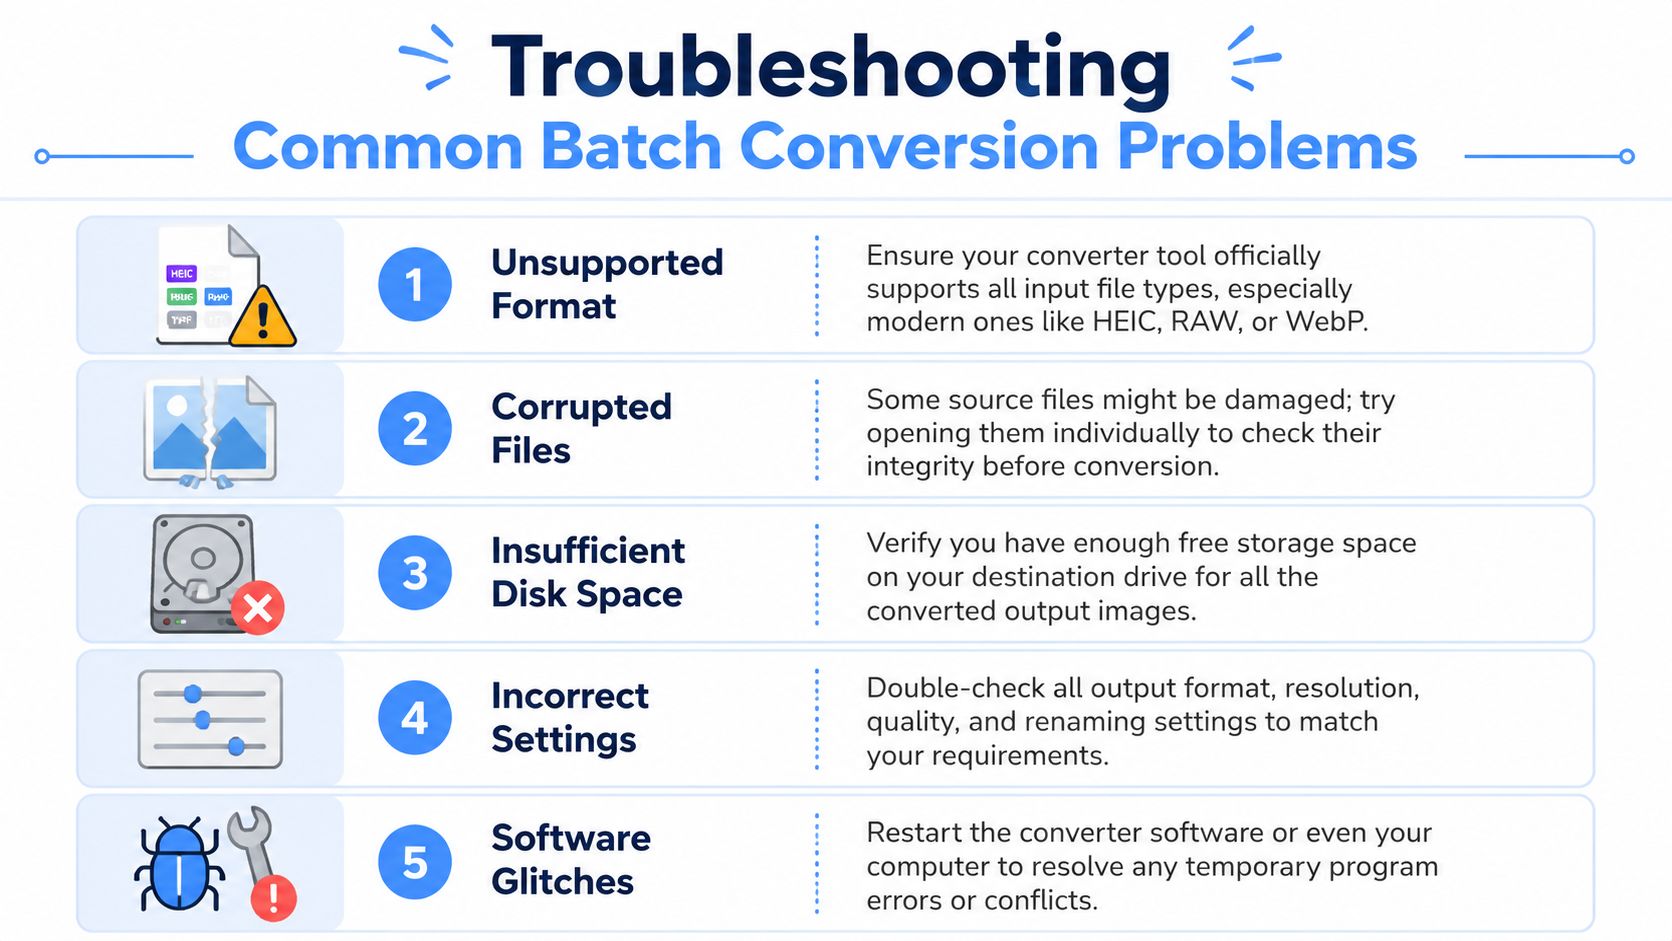
What causes bad output
Stretched or squashed images almost always come from forcing both width and height instead of preserving the original proportions. I see this most often in quick resize presets built for web banners or marketplace uploads. If the converter does not lock aspect ratio, every portrait and panorama becomes a cleanup project.
Overwritten originals happen when the output folder points back to the source folder, or when the naming rule keeps the same filename and extension. That is an avoidable mistake, but it is still one of the costliest. Once a batch starts replacing source files, recovery depends on backups, not settings.
Color shifts usually come from profile problems. A file may look fine in one viewer and washed out somewhere else because the export stripped the ICC profile or converted the image into a color space the destination platform handles poorly. JPEGs for the web usually behave best in sRGB. Print or archive workflows need more care.
Failed conversions often come down to format limits. HEIC from iPhones, camera RAW files, layered PSDs, and newer formats like AVIF need explicit support. Browser-based converters are often the weakest here, and they are the last place I want sensitive client photos or unpublished product shots anyway.
A practical pre-flight checklist
Run a small sample first. Five files will tell you more than five hundred after the mistake is already baked in.
Before a larger batch, check these settings in this order:
- Confirm format support: Verify that the app can read your actual source files, especially HEIC, RAW, AVIF, PSD, or camera-specific formats.
- Set a separate output folder: Keep converted files away from the untouched source set.
- Preserve aspect ratio: Use resize rules that scale proportionally unless a fixed crop is intentional.
- Review one export at full size: Thumbnails hide compression artifacts, sharpening halos, and color issues.
- Check disk space: Large TIFFs, PNGs, and RAW-derived exports can fill a drive fast.
- Validate the naming rule: Catch collisions and bad suffixes before the app processes the whole folder.
A good second check is the destination itself. Shopify, WordPress, email builders, print labs, and DAM systems all have their own preferences for file type, dimensions, and color handling. Adobe's image sizing guidance is a useful reference for avoiding distortion and choosing resize methods that keep proportions intact: Adobe on resizing images without stretching.
If a batch fails, change one setting, rerun a small sample, and confirm the result before touching anything else.
That approach is slower for two minutes and faster for the rest of the day.
If you want one desktop app that handles image conversion, metadata cleaning, resizing, renaming, and repeat batch workflows without uploading anything, File Studio is the practical fit. It runs offline on macOS and Windows, supports modern formats like HEIC, AVIF, WebP, and RAW, and keeps sensitive files on your device where they belong.